Wednesday, December 24th: We guarantee 10-3, but if you are desperate and can't get here, just give us a call and we will make arrangements to stay for you.
Thursday, December 25th: Closed
Friday, December 26th-Tuesday, December 30th: Regular Hours
Wednesday, December 31st: 10-2
Thursday, January 1st: Closed
Friday, January 2nd: Resume Regular Hours
Tuesday, December 23, 2008
Friday, December 19, 2008
My Hands are Cold!

Last night on Weather Underground they predicted something called "Ice Pellets" in our zip code. I don't know if that is something other than what is commonly referred to as sleet, but whatever it is, it sounds like today is a day for mittens. A few weeks ago we had a thrummed mitten class, which was a lot of fun and a big success. What is a thrummed mitten you ask? Basically, it is a simple mitten which has bits of roving fluff knit into some of the stitches, generally in a symmetrical pattern, with the fluff ends to the inside of the mitten to create a fuzzy warm interior. Here's some things that you can use:

From the top we have roving that has been prepared for spinning, then wool batt, pencil roving and a single ply yarn. The top two are what are traditionally used for thrumming, but you could use pencil roving or any bulky singles yarn as well, not traditional, no, but we're talking about getting your hands warm FAST!
Many people would say that unless you are using roving or fleece you are not actually making a thrummed mitten. While I tend to agree with the traditionalists on most things, necessity is the mother of invention (and loose interpretation) and if I have cold hands I am going to thrum mittens with whatever I have laying around the house--even cotton balls if I were desperate and hours away from being sent on an arctic voyage.
Also, I don't own a whole lot of roving as I am merely a tourist in the world of spinning and the bit of roving I do have I covet. It just seemed wrong to make thrummed mittens with my Socks that Rock Sheep 2 Shoe Kit.
Here is what a basic thrummed mitten, done properly with roving, looks like on the outside:

The above mitten was knit with Manos Clasica and some Black Bunny Fibers Wensleydale roving I had in my stash. It was the first roving I ever purchased and I learned to spin with it. I ended up (unintentionally) destroying it and create this mitten with the remnants. Curious to thrum more things, I swatched using Manos Clasica for thrums to see how it would look:

Not too shabby, if I do say so myself. I just cut 6" pieces of Manos and held two together to create each thrumm. Here is a photo from class of one of the students knitting her thrum into the mitten:
 No matter what you use to make your thrums, the technique is essentially the same; you knit to a stitch you want to thrum, insert the tip of your right hand needle into the stitch, fold your thrum in half and wrap the center of your thrum material around the right hand needle with the material's ends facing the inside of your mitten, wrap the yarn around the needle as if to knit and pull both the thrum and the stitch through the stitch on the left hand needle and slide the new stitch off. Thrum complete! Now, on the next round you knit into the back of the thrummed stitch, twisting it, and this makes the thrum pop, or sit up straight on the ground of the fabric. Without knitting into the back of this stitch you won't get that nice "fair-isle" look to your mitten. Your thrummed "v" stitches will fall into the fabric and look messy and get lost.
To work with washed, unprepared fleece or from wool batt pull off a piece of fleece that is about 1-2 cm thick and about 4-6' long. Leave 'tails' of equal length to the inside of the mitten as you work the thrum.
Working with sliver, or fleece that has been commercially prepared for spinning, is perhaps the easiest. To work this method simply work as above for working with fleece, pulling off bits, or slices, of fleece from the sliver to create thrums.
Working with single ply wool yarn or pencil roving is worked basically the same way, just cut 4-6" lengths of pencil roving or yarn and hold 2-3 strands together for each thrum. Here's what the inside of a mitten done in this way would look like:
 You can also work 2 strands of yarn together by pulling from the center and outside of a center pull ball. On first thrum, leave a 6" tail, insert tip of right hand needle into next stitch, wrap the double strand around the right hand needle counter clockwise or the "wrong way," wrap the yarn (the main working yarn) around the stitch clockwise or the "right way," and slip both off the left hand needle. Leave a loop about 4-6" in total length and work the next thrum the same way, without cutting the yarn.
So, get out your dpns and cast on! It's cold out there, what are you waiting for?
Thrummed Mittens
Materials:
One skein of Manos Clasica
2 oz of roving OR 150 yds of pencil roving OR a contrast color of Manos Clasica for the thrums.
#10 dpns or size to obtain gauge.
2 ring markers
Gauge: 4 sts per inch in stockinette stitch
Size: Adult Small (Medium, Large). You can increase or decrease the size by adding or subtracting a multiple of 4. Each multiple of 4 will add or subtract about one inch.
Cast on 32 (36, 40) sts. Divide onto 4 dpns.
Join and work in k2, p2 rib for 10 (10, 12) rounds.
Pattern:
1-3: Knit
4: *thrum 1, k3; rep from * to end of round.
On row after thrums are placed knit through the back of the stitch.
These 4 rows form your pattern.
Work 2 repeats of pattern.
Work row 1.
On next row 1 place thumb by knitting 6 (6, 8) sts and placing on holder.
 Knit to end of round. On round 2 of pattern cast on 6 (6, 8) sts over 6 (6, 8) sts on holder.
 Continue mitten in pattern until it measures 7, 8, 9" from beginning.
Shape top:
Keep thrum pattern as set.
1. *k6, k2tog; rep from * to end.
2. K
3. *k5, k2tog; rep from * to end.
4. K
5. *k4, k2tog; rep from * to end.
6. *k3, k2tog; rep from * to end.
7. *k2, k2tog; rep from * to end.
8. *k1, k2tog; rep from * to end.
Cut yarn, leaving a 10" tail. Thread end through live stitches and fasten off.
Thumb:
Place thumb sts from holder evenly onto 2 dpns. Pick up and knit 6 (6, 8) sts from cast on stitches onto 2 dpns. Knit around on these 12 (16, 20) sts as follows:
1-3: knit
4: thrum 1, k2 (3).
Work rows 1-4 3 (4) times and then work rows 1-2 once more.
Decrease by k2tog around all sts and fasten off as for top.
Cut yarn, leaving a 10" tail.
Thread through live stitches and pull closed.
Weave in ends.

Enjoy!
Wednesday, December 17, 2008
Check it out!
Over the last few weeks we have been delighted to see some current Rosie's staffers appear in the "knitosphere" as published knitwear designers!
Laura, co-author of Knit So Fine, has a gorgeous sweater, the Ropes and Picots Cardigan, in the Winter 2008 Interweave Knits. It is knit out of a new Rosie's favorite, Scottish Tweed DK in Apple, available in the shop. The sweater embodies what we love about knitting -- classic techniques and vintage inspiration paired with meticulous details in a tweed yarn that manages to be both feminine and rustic.

Also, this month, Courtney has a pair of socks in Carol's new book by Interweave, Knitting Socks with Handpainted Yarn. Inspired by Anni Albers and traditional fair isle motifs, her socks are a new and gorgeous example of the possibilites of handdyed yarns if you think outside the box. We have her original pair in the shop and copies of the book to pick up as a perfect gift for the sock knitter on your list. Better yet, grab two copies and knit a pair for yourself or as a last minute gift for someone you love. This great book is full of wonderful designs using all of our favorite handpainted yarns, including Koigu and Black Bunny Fibers! 
Beautiful job Carol, Courtney and Laura!
Laura, co-author of Knit So Fine, has a gorgeous sweater, the Ropes and Picots Cardigan, in the Winter 2008 Interweave Knits. It is knit out of a new Rosie's favorite, Scottish Tweed DK in Apple, available in the shop. The sweater embodies what we love about knitting -- classic techniques and vintage inspiration paired with meticulous details in a tweed yarn that manages to be both feminine and rustic.
Also, this month, Courtney has a pair of socks in Carol's new book by Interweave, Knitting Socks with Handpainted Yarn. Inspired by Anni Albers and traditional fair isle motifs, her socks are a new and gorgeous example of the possibilites of handdyed yarns if you think outside the box. We have her original pair in the shop and copies of the book to pick up as a perfect gift for the sock knitter on your list. Better yet, grab two copies and knit a pair for yourself or as a last minute gift for someone you love. This great book is full of wonderful designs using all of our favorite handpainted yarns, including Koigu and Black Bunny Fibers!
Beautiful job Carol, Courtney and Laura!
Monday, December 15, 2008
Knitting Circle Holiday Party!
This Wednesday night from 6-8 bring an item from your stash and participate in the chaotic Pollyanna. Bring a snack or beverage to share, if you like. Guaranteed to be a fun, yarny time.
Tuesday, December 02, 2008
Bert's Mittens
Last week while Lisa was knitting another pair of mittens using this new Noro yarn, Yuzen, she started thinking out loud. Could you knit the mitten sideways and short-row the whole thing to create the shaping for the top of the hand? Could you do it and never have to sew a seam? Could you do it in one skein?
Lisa always likes a challenge. Quoting her:
"This is one of those "because you can" projects: Knitting a pair of mittens in self-striping yarn made me think about all the things knitters do to manipulate the stripes. The rest of the design decisions were motivated by two things: one, I hate sewing seams (so the hand section opens with picked-up stitches and closes with a three-needle bind-off); two, I HATE weaving in ends (so the knitting is continuous from the cast-on at the cuff to the final closure of the thumb)."
 This mitten is not for the faint of heart. There is some wacky shaping going on, although in true Lisa style her pattern reads more like prose in parts than a mathematical formula. When people come into the shop with patterns like this I often say something like, "Just do exactly what the pattern says, without question, even if you have no idea why you are doing what you are doing." This pattern fits that bill. By the second mitten you'll know what's going on. And it's amazing.
 These mittens use this new yarn from Noro, Yuzen. It's a self striping DK weight yarn with an interesting fiber content: 56% wool, 34% silk, 10% kid mohair. $10 a ball, you'll only need one for these mittens. Note that Lisa mentions in the pattern that she had 6" of yarn remaining when she cast off the second mitten so if you're gauge isn't right or if you adjust the size you'll want a second skein.
 Download Bert's Mittens, December's Project of the Month, and have fun knitting this puzzle!

Lisa always likes a challenge. Quoting her:
"This is one of those "because you can" projects: Knitting a pair of mittens in self-striping yarn made me think about all the things knitters do to manipulate the stripes. The rest of the design decisions were motivated by two things: one, I hate sewing seams (so the hand section opens with picked-up stitches and closes with a three-needle bind-off); two, I HATE weaving in ends (so the knitting is continuous from the cast-on at the cuff to the final closure of the thumb)."
 This mitten is not for the faint of heart. There is some wacky shaping going on, although in true Lisa style her pattern reads more like prose in parts than a mathematical formula. When people come into the shop with patterns like this I often say something like, "Just do exactly what the pattern says, without question, even if you have no idea why you are doing what you are doing." This pattern fits that bill. By the second mitten you'll know what's going on. And it's amazing.
 These mittens use this new yarn from Noro, Yuzen. It's a self striping DK weight yarn with an interesting fiber content: 56% wool, 34% silk, 10% kid mohair. $10 a ball, you'll only need one for these mittens. Note that Lisa mentions in the pattern that she had 6" of yarn remaining when she cast off the second mitten so if you're gauge isn't right or if you adjust the size you'll want a second skein.Download Bert's Mittens, December's Project of the Month, and have fun knitting this puzzle!
Wednesday, November 26, 2008
Turkey Day!
Rosie's Thanksgiving Hours:
WEDNESDAY 10-8 (Knitting circle is on from 6-8pm!)
THURSDAY: Closed
FRIDAY: 10-8 (Extended Black Friday hours!)
SATURDAY: 10-6
SUNDAY 12-5
See you soon!
WEDNESDAY 10-8 (Knitting circle is on from 6-8pm!)
THURSDAY: Closed
FRIDAY: 10-8 (Extended Black Friday hours!)
SATURDAY: 10-6
SUNDAY 12-5
See you soon!
Tuesday, November 25, 2008
Thrown Together
This just in...
The new Kim Hargreaves book, Thrown Together.
 A fantastic new book from Rowan designer Kim Hargreaves. This book is beautifully styled and photographed, making flipping through it's pages worthy of a night spent laying on the couch (which is how I spent part of my evening last night). The patterns have a vintage flair, as did Heartfelt--last winter's book from Kim Hargreaves. It's not just the styling on the pictures however, it's the style, cut and proportions on the garments themselves. Evie, below, is a cute basic cardigan that is designed to look 'oversized' even thought the armhole is fit close to the body and there is a little waist shaping kept close to the hem. It has pockets, always a nice touch, and uses a horizontal welt style rib of knits and purls to give textural interest and, again, a vintage look. This is a great simple sweater, perfect for a novice who doesn't want to look like she's making her first sweater.

 Heather
 Olivia
The new Kim Hargreaves book, Thrown Together.
A fantastic new book from Rowan designer Kim Hargreaves. This book is beautifully styled and photographed, making flipping through it's pages worthy of a night spent laying on the couch (which is how I spent part of my evening last night). The patterns have a vintage flair, as did Heartfelt--last winter's book from Kim Hargreaves. It's not just the styling on the pictures however, it's the style, cut and proportions on the garments themselves. Evie, below, is a cute basic cardigan that is designed to look 'oversized' even thought the armhole is fit close to the body and there is a little waist shaping kept close to the hem. It has pockets, always a nice touch, and uses a horizontal welt style rib of knits and purls to give textural interest and, again, a vintage look. This is a great simple sweater, perfect for a novice who doesn't want to look like she's making her first sweater.
Evie
Yarn: Cashsoft 4-Ply (also perfect for 4-Ply Soft or Cashcotton 4-Ply)
Gauge: 7 sts to 1"
Materials: 7 (8, 8, 9, 10, 10) balls of Cashsoft 4-Ply (218 yds/ball)
Gauge: 7 sts to 1"
Materials: 7 (8, 8, 9, 10, 10) balls of Cashsoft 4-Ply (218 yds/ball)
Sizes: (to fit bust) 32 (34, 36, 38, 40, 43
Below is another great sweater, fitted to the body with a little bit of ease, perfect waist shaping, a low, modified square neck with a set in sleeve. She again uses a horizontal rib at the neck and waist reminiscent of the late 20's and early 30's and on this one the sleeve has just a little bit of a puff at the wrist before tapering into a long ribbed cuff. Great detail!

Still
Yarn: Calmer 75% Cotton, 25% Microfiber 175 yds
Gauge: 20 sts to 4" on a US 7-8 needle
Materials: 7 (8, 8, 8, 9 ,10)Sizes: (to fit bust) 32 (34, 36, 38, 40, 43
The next two sweaters use Rowan Felted Tweed, one of our most favorite all time yarns.
 Heather
Yarn: Felted Tweed, 50% merino wool, 25% alpaca and 25% viscose/rayon
Gauge: 23 sts to 4" on a US 5-6 needle
Gauge: 23 sts to 4" on a US 5-6 needle
Materials: 6 (7, 7, 8, 8 ,8)
Sizes: (to fit bust) 32 (34, 36, 38, 40, 43
Sizes: (to fit bust) 32 (34, 36, 38, 40, 43
 Olivia
Yarn: Felted Tweed, 50% merino wool, 25% alpaca and 25% viscose/rayon
Gauge: 23 sts to 4" on a US 5-6 needle
Materials: 7 (7, 8, 8, 9, 9) balls 191 yds / 50 gms
Sizes: (to fit bust) 32 (34, 36, 38, 40, 43
Gauge: 23 sts to 4" on a US 5-6 needle
Materials: 7 (7, 8, 8, 9, 9) balls 191 yds / 50 gms
Sizes: (to fit bust) 32 (34, 36, 38, 40, 43
Stop in to see all 16 patterns in this great book!
Thursday, November 20, 2008
Penny Straker Trunk Show!
We recently received a great trunk show featuring countless Penny Straker Designs. Her patterns are timeless, classic and cover a broad range of aesthetics and abilities. Many of us at the store relish the more traditional format (and black and white photography -- as you can see below) of the original designs, but it is always really great to see the finished samples in person.
One of the most recognizable Penny Straker patterns is the Owl Bonnet and Cardigan.
 We have the infant sample in the store (even cuter in person if you can believe it!) but the pattern is offered in in multiple sizes, infant up to children's size 10 (I am constantly tempted to break out the aran weight and knit an adult sweater for myself....one day....)
Another beautiful sample we have in Innisfree, a infant/toddle aran cardigan. Knit in sportweight washable wool, it is the perfect combination of technique, beauty, classic design and hierloom quality. If you have always wanted to knit an aran, this size is a perfect stepping stone to an adult sized project as well.
 For adult sweaters, we have a wonderful mix of men and women's cardigans and pullovers. Since the weather has cooled considerably in the last week, we have been passing the Shalor Pullover around. Shown here modeled on a man, and then myself, it is a perfect oversized woman's sweater as well.

Another great pattern we have in the store is the Whit Vest. Shown below modeled by Courtney and also in the original pattern photo, it is easy to see how a classic design can look modern and timeless throughout the decades depending on color choice and wearer.
 We have many more samples in the shop for you to check out and the full binder of every pattern in the line! Come in, pile on the knitwear and cast on for a classic design this season.
One of the most recognizable Penny Straker patterns is the Owl Bonnet and Cardigan.
We have the infant sample in the store (even cuter in person if you can believe it!) but the pattern is offered in in multiple sizes, infant up to children's size 10 (I am constantly tempted to break out the aran weight and knit an adult sweater for myself....one day....)Another beautiful sample we have in Innisfree, a infant/toddle aran cardigan. Knit in sportweight washable wool, it is the perfect combination of technique, beauty, classic design and hierloom quality. If you have always wanted to knit an aran, this size is a perfect stepping stone to an adult sized project as well.
For adult sweaters, we have a wonderful mix of men and women's cardigans and pullovers. Since the weather has cooled considerably in the last week, we have been passing the Shalor Pullover around. Shown here modeled on a man, and then myself, it is a perfect oversized woman's sweater as well.
Another great pattern we have in the store is the Whit Vest. Shown below modeled by Courtney and also in the original pattern photo, it is easy to see how a classic design can look modern and timeless throughout the decades depending on color choice and wearer.
 We have many more samples in the shop for you to check out and the full binder of every pattern in the line! Come in, pile on the knitwear and cast on for a classic design this season.
Tuesday, November 18, 2008
Books Books Books!
We just got in a huge shipment of books in time for the holidays! New publications, old favorites; you name it! Here's a few ideas for your holiday wish list:
 This book, Vintage Knitwear, is on my list this year. As many of you know, I love knitting from Vintage patterns and have been disappointed year after year with by the "vintage" knitting books that have come down the pipeline. Vintage Knitwear is different, though. It's actually REALLY GOOD! The projects fit the models right, they are proportioned the way the originals were (no deeeeep armholes here!) and they stay true to the period in choice of yarn. All around, a great book.
 Looking for a few good knitting related coffee table books for the knitter in your life? If that knitter is also an artist check out Knitting Art: 150 Innovative Works from 18 Contemporary Artists. This book also includes work from my fiber professor from college, Lindsey Obermeyer! A beautiful, fun and inspiring read.
 Shear Spirit is another great hardcover book, perfect for gift giving. Have a friend who spins wool from his or her own flock, or wishes s/he had a little farm of his or her own so s/he could? This book takes inspiration from 10 fiber farms in North America and includes 20 great patterns to boot!
 The newest book from Shannon Okey is Alt Fiber: 25 Projects for Knitting Green with Bamboo, Soy, Hemp and More. A great gift idea for the person who just can't wear wool. Pick this book up with a couple of balls of one of our bamboo, soy or other "alt fiber" yarns and you've got one gift you can cross off your list.
 Knitting Noro by Jane Ellison is hot off the presses this fall season. Jane Ellison, who has been the "in-house" designer for KFI is out on her own, publishing great designs with this self-striping classic. If you or someone you love is a Noro junkie (and we know you're out there) check this book out.
 I don't need to say much about Knitted Lace of Estonia by Nancy Bush. We've got it back in stock so come and get it.
 If you have a daughter, neice or god daughter who loves to knit this is a great gift this season. Phoenix Bess, teenage knitwear designer, has published her own book with 30 patterns. Very cute, very fashionable and totally knittable.
 Continuous Cables is the follow-up to Melissa Leapman's Cables Untangled from last year. More great designs from this talented designer using interesting cable techniques and formations.
 And now we venture into stranger territory. All the new shiny books above are great, but my true passion lies below in the off beat and hard to find books highlighting the history and tradition of knitting that I so love.
 And relatively new from Annemor Sundbo is Invisible Threads in Knitting which doesn't really have patterns, per se, but is more about the esoteric and magical history of knitting and the connections between the people who practice this craft. Bizarre and amazing.
 A classic, back in print, is Shelagh Hollingworth's Traditional Aran Knitting. Complete with great photos of 70's mustached men modelling shawl collar aran cardigans. A great book to complete any knitting library.
 This book is new for us and went home with me immediately. Traditional Island Knitting traces the history of the British and Scandinavian Isles knitting traditions and includes (somewhat dated) classic knitting patterns from each region. Amazing historical record and a great source for that basic pullover you've been wanting to make! Excuse me, I'm going to cast on.
 For the knitwear designers out there, James Norbury's Traditional Knitting Patterns from Scandinavia, the British Isles, France, Italy and other European Countries is an invaluable historical resource. Get this book while it's still available!
 And so that rounds up our book round-up! Get in and check out what other great books we have in stock.
New from Stephanie Japel, author of Fitted Knits and one of the queens of the "top-down-raglan" comes Glam Knits. This blogger-cum-designer is the brains behind Glampyre.com, a popular online knitting blog. This book features tons of sexy knits and luxury yarns--a perfect gift for you this season!
 This book, Vintage Knitwear, is on my list this year. As many of you know, I love knitting from Vintage patterns and have been disappointed year after year with by the "vintage" knitting books that have come down the pipeline. Vintage Knitwear is different, though. It's actually REALLY GOOD! The projects fit the models right, they are proportioned the way the originals were (no deeeeep armholes here!) and they stay true to the period in choice of yarn. All around, a great book.Looking for a few good knitting related coffee table books for the knitter in your life? If that knitter is also an artist check out Knitting Art: 150 Innovative Works from 18 Contemporary Artists. This book also includes work from my fiber professor from college, Lindsey Obermeyer! A beautiful, fun and inspiring read.
 Shear Spirit is another great hardcover book, perfect for gift giving. Have a friend who spins wool from his or her own flock, or wishes s/he had a little farm of his or her own so s/he could? This book takes inspiration from 10 fiber farms in North America and includes 20 great patterns to boot!The newest book from Shannon Okey is Alt Fiber: 25 Projects for Knitting Green with Bamboo, Soy, Hemp and More. A great gift idea for the person who just can't wear wool. Pick this book up with a couple of balls of one of our bamboo, soy or other "alt fiber" yarns and you've got one gift you can cross off your list.Knitting Noro by Jane Ellison is hot off the presses this fall season. Jane Ellison, who has been the "in-house" designer for KFI is out on her own, publishing great designs with this self-striping classic. If you or someone you love is a Noro junkie (and we know you're out there) check this book out.
 I don't need to say much about Knitted Lace of Estonia by Nancy Bush. We've got it back in stock so come and get it.
 If you have a daughter, neice or god daughter who loves to knit this is a great gift this season. Phoenix Bess, teenage knitwear designer, has published her own book with 30 patterns. Very cute, very fashionable and totally knittable. Continuous Cables is the follow-up to Melissa Leapman's Cables Untangled from last year. More great designs from this talented designer using interesting cable techniques and formations.
 And now we venture into stranger territory. All the new shiny books above are great, but my true passion lies below in the off beat and hard to find books highlighting the history and tradition of knitting that I so love.
 Firstly, we have the classic Setesdal Sweaters by Annemor Sundbo, Norway's cultural treasure and historian of all things knit. She traces the history of this item of traditional Norwegian dress from it's beginnings along the hearthside to it's mass production. And for those of you who follow such things we've just (this morning) gotten word that Everyday Knitting: Treasures from a Ragpile is back in print!
And relatively new from Annemor Sundbo is Invisible Threads in Knitting which doesn't really have patterns, per se, but is more about the esoteric and magical history of knitting and the connections between the people who practice this craft. Bizarre and amazing.A classic, back in print, is Shelagh Hollingworth's Traditional Aran Knitting. Complete with great photos of 70's mustached men modelling shawl collar aran cardigans. A great book to complete any knitting library. This book is new for us and went home with me immediately. Traditional Island Knitting traces the history of the British and Scandinavian Isles knitting traditions and includes (somewhat dated) classic knitting patterns from each region. Amazing historical record and a great source for that basic pullover you've been wanting to make! Excuse me, I'm going to cast on.For the knitwear designers out there, James Norbury's Traditional Knitting Patterns from Scandinavia, the British Isles, France, Italy and other European Countries is an invaluable historical resource. Get this book while it's still available!
 And so that rounds up our book round-up! Get in and check out what other great books we have in stock.
 See you soon!
Tuesday, November 11, 2008
A Great Weekend!
We just returned from a great show at the Baltimore Convention Center, Stitches East. It was great seeing all of you who stopped in to say "Hi!" and it's always nice to see those familiar faces that we only see during the show. Our booth was next door to Brooks Farm this year, and we did manage not to steal yarn off the back of their shelves. Such restraint. Kate and I both bought some Cottage Craft yarn (as Kate would say, "Yarn with a capital 'Y'.") It's a very sturdy wool in a beautiful heathered brown/plum color and very scratchy. It's definitely for outerwear, I think. Stacy got some beautiful Seacolors yarn in 2 colors for a something or other and Lisa tried to buy the things on her list , managed to get none of them, but walk away (yet again) with space-dyed laceweight yarn. At least she's consistent and knows what she likes, right? It was a lot of fun, and those of you who didn't make it this year, we look forward to seeing you next year at Stitches East in Hartford, Connecticut.
Thursday, November 06, 2008
November Project of the Month: A Cap for Nessa's Mother
It's been a busy week here at Rosie's! We packed up the Uhaul yesterday and sent Lisa, Stacy, DC and Abby down to Baltimore for Stitches East which is this weekend (Friday-Sunday) at the Baltimore Convention center. Every year we pack up part of the store and head down to Stitches where we set up a booth (three booths this year!) and sell yarn and meet people. This year Lisa, Carol and Laura are all signing Knit So Fine in our booth at 3:30 on Saturday, and we also have a trunk show of all the garments! They are really lovely. Be sure to stop by and try on your favorite! We also have a lot of the yarns there so you can purchase projects and get your book signed all in one fell swoop. Stacy is designing our booth space this year so it's sure to be adorable. Kate and I also made kits of all your favorite Rosie Knits patterns, like Selbu Modern, the Sugar Mountain Beret, Trellis Lace Capelet and more. They are super cute. Stay tuned, the kits will be available in the shop and online for holiday shopping this year. They are sure to be a hit. Which brings me to the topic of this blog post, the new Project of the Month!

See you at Stitches!
A Cap for Nessa's Mother

I know the name is sort of a mouthful, but there's a story behind it.
Years ago, when I first started working here, the office was strictly Lisa's domain. Occasionally she would ask me to print out a pattern for a customer and I would take a deep breath and dive into the tangeled mess of files. Throughout the years so many patterns had been written, rewritten, edited, renamed or abandoned that the "My Documents" section of the office PC was overrun with files called things like, "Sweater revision for Frances" or "How I make my buttonholes" or "A Cap for Nessa's Mother." I familiarized myself with all of them so that I could help the customers and also so I would know where to find a basic worsted weight watchcap pattern for a toddler (the file called, shockingly, "Kid's Worsted Watchcap") so I could just print it out for a customer instead of pouring through books. There's all kinds of useful things in that "My Documents" folder that Lisa has accumulated over the years: Items like, "Big Cable Hat" "Child's Poncho" "Crocheted Kippot" "Easy Felt Bag" and "Fuzzy Fingerless Mittens".
A Cap for Nessa's Mother began as just that. A woman, ostensibly named Nessa, came in with a hat that her mother had knit years ago with yarn and a pattern from Wanamakers, so long ago that Wanamakers was not only still in business but it also had a wool department. Her mother had lost the pattern and wanted to make the hat again. Lisa looked at the hat and concocted a pattern for her. Years passed, and then I resurrected it in all it's cute glory. The time has come, and this is a great quick knit perfect for an "in-between projects" project or as a quick gift for the holidays. I knit this one in Manos Silk Blend color 3044 briar, Stacy has already whipped one up in Black. It uses under one skein of yarn, so it's also great for using up scrap yarn you have at home. I would guess that I used about 3/4 of a skein, or about 100 yds. Download the free pattern now!
See you at Stitches!
Tuesday, October 28, 2008


Thursday, October 23, 2008
Handjive: Natures Palette
It is hard to believe we are still getting new yarn in at the shop. Some of the packages are expected -- yet still exciting -- standbys, some appear without warning (new amazing Japanese books in the shop!!) and some, like Nature's Palette from Handjive are well worth the wait!
When Courtney and I went to the Handjive booth at TNNA, we knew we needed to round out our selection of a perennial favorite, Nature's Palette Fingering. We brought in some new colors to add to our original grouping and now have a great selection of the subtly shaded, naturally dyed buttery soft merino for you to choose from. Think baby sweaters, hats, fair isle, socks, pulse warmers, mittens or a beautiful shawl.
 While in the booth, we also saw a new yarn from Handjive, Nature's Palette Thick and Thin. This yarn is not your run of the mill bulky: it is amazingly soft, comes in whopping 150g/168 yard skeins and has really beautiful and subtle color variation. The Thick and Thin structure adds visual interest with minimal effort -- think seed stitch, a slipped stitch pattern even a simple cable. Stacy whipped up an adorable hat in mere hours using only 1/2 a skein (even with earflaps!) and plans on using the rest for a pair of matching handwarmers. One skein would also be plenty for a comfy scarf, cowl or mittens. A perfect yarn to knit a sure-to-be-loved and quick gift.

it is never too early to start knitting for holiday gifts -- whether it be a fine gauge baby sweater or socks or chunky scarf!
When Courtney and I went to the Handjive booth at TNNA, we knew we needed to round out our selection of a perennial favorite, Nature's Palette Fingering. We brought in some new colors to add to our original grouping and now have a great selection of the subtly shaded, naturally dyed buttery soft merino for you to choose from. Think baby sweaters, hats, fair isle, socks, pulse warmers, mittens or a beautiful shawl.
 While in the booth, we also saw a new yarn from Handjive, Nature's Palette Thick and Thin. This yarn is not your run of the mill bulky: it is amazingly soft, comes in whopping 150g/168 yard skeins and has really beautiful and subtle color variation. The Thick and Thin structure adds visual interest with minimal effort -- think seed stitch, a slipped stitch pattern even a simple cable. Stacy whipped up an adorable hat in mere hours using only 1/2 a skein (even with earflaps!) and plans on using the rest for a pair of matching handwarmers. One skein would also be plenty for a comfy scarf, cowl or mittens. A perfect yarn to knit a sure-to-be-loved and quick gift.
it is never too early to start knitting for holiday gifts -- whether it be a fine gauge baby sweater or socks or chunky scarf!
Tuesday, October 21, 2008
Dayquil = Inability to do basic arithmetic
So....I was overcome with a mini plague last week that rendered me non-functional unless heavily phisically and mentailly modified withthe help of Dayquil. Along with feeling better, when under the influence of the little orange-candy flavored muse, I lost all ability to do basic arithmetic. As a result -- and even though Jen handed me an error free pattern to format -- a few errors were made in Dahlia when I was typing it up. As of today, October 21st at 11 am, the corrected version is available here.
So sorry about this!!
So sorry about this!!
Wednesday, October 15, 2008
Dahlia
A few weeks ago we got Ella Rae Lace Merino in at the shop in 4 saturated and varied colors. Jen immediately dove for "Primarys" -- a skein containing every rainbow color under the sun. Armed with her very bright skein, she set forth with the task of coming up with a pattern that highlighted the sproing, drape, twist and saturation of the yarn.
 The end result is a beauty. The openwork pattern really shows off the colors without looking too "clowny". The entire scarf only requires one skein, making it a perfect present or affordable fall treat for yourself.
 Variegated yarns can look beautiful in the skein, but lose something when knit up -- the colors don't play well, or pool in an undesirable way. Jen's pattern paired with the Ella Rae Lace Merino is an exception to this in every way and the end result really works!
If you would like to knit Dahlia, click to download the pattern below. As an extra incentive, Ella Rae Lace Merino is the featured Yarn of the Week and a steal at only $20/skein. If you purchase the yarn online, we will include the pattern for free, or stop in the shop and grab a skein in person!
Thursday, October 09, 2008
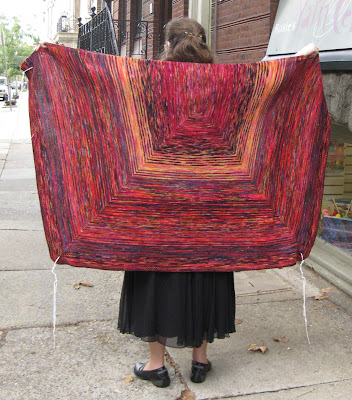
KPPPM at Prayer (or, There's Hope for Every UFO)
It's a long time ago now that I decided I needed a new tallit, or prayer shawl. I kind of think it was sometime in 2002 or 2003, but it's hard to be sure; it's before this blog started, anyway.
It was not just an excuse to collect red skeins of Koigu, no matter what anyone says.
But by last year, each row was over 700 stitches, and there were 5 circular needles in the thing (size 3, if you want to know). I began planning for the end -- a seed-stitch border, seed-stitch blocks in the corners where the ritual fringes go -- but progress was still mighty slow.
O.k., I'm not 100% sure it's finished. Most tallitot have a strip along the upper edge called the atarah, or crown. It usually has, either woven in or embroidered, the blessing we say upon putting on the tallit. (Some have the owner's name instead.) I had plenty of time to think about an atarah while I was knitting the tallit. Here are some options: buy one (no offense, but no thanks), embroider my own on purchased cloth (I'm not that good an embroiderer, and still not keen on purchasing the cloth), weave a strip of cloth (still have the embroidery problem). Or knit one: knit in the words (anyone seen a charted Hebrew alphabet lately?), using intarsia or lace or seed stitch, on some very, very fine yarn with very, very small needles. I'd welcome all citations to charted Hebrew alphabets, but don't be surprised if I don't cast on right away.
It was not just an excuse to collect red skeins of Koigu, no matter what anyone says.
From a ritual standpoint, the design requirements were pretty simple: it had to have four corners, and it couldn't combine fibers of linen with fibers of wool. One thing I knew I didn't want to do was cast on a number of stitches, work for a long time, and cast off -- this was not going to be some extra-large scarf. I wanted something that was interesting to knit, but not real challenging, and I wanted a simple design for wearability (though I was also afraid that I'd get bored with the finished product, which will be worn weekly).

Koigu solved the boredom problem, because it's always changing. It would also be lightweight, which made it a good choice for year-round wear. I started with about half a dozen different red-related skeins, knowing that they wouldn't be enough, but also knowing I'd be able to blend new ones in. I used the same strategy as several of the Koigu shawl patterns: several rows of Skein A, followed by alternating 2-row stripes of Skein A and Skein B, followed by several rows of Skein B, and so on.
I also didn't know exactly how large the finished object should be. I like mitered things, so I planned to work from the center outward. But I didn't want a square. I made a (fairly wild, fairly inaccurate) guess about the ultimate proportion I'd want, and I cast on a number of stitches that was related to how much wider a tallit should be than its depth. I then picked up stitches along the underside of the cast-on and began working back and forth, increasing twice at the middle of the row.

As the rows got longer and longer, each skein ran out sooner. Eventually, I stopped working any plain sections; once the transition from Skein K to Skein L was complete, I immediately began alternating Skein L with Skein M. Not all of my skeins were full to begin with, since I'd begun to buy mill-ends any time I saw useful shades.
While all of this was happening, time was passing. It didn't take long for the piece of fabric to get too big to carry around easily, and this was the kind of project that got interrupted all the time for smaller, more urgent items. I never had a deadline, but about twice a year -- often before Passover, and almost always over the summer, as I anticipated the High Holy Days -- I'd start thinking that it would be really nice to get it finished.
But by last year, each row was over 700 stitches, and there were 5 circular needles in the thing (size 3, if you want to know). I began planning for the end -- a seed-stitch border, seed-stitch blocks in the corners where the ritual fringes go -- but progress was still mighty slow.
I finished in the Spring (though not in time for Passover). I tied the fringes myself, following the instructions in the first Jewish Catalog (Siegel, Strassfeld, and Strassfeld; JPS, 1973), though I bet you could find instructions on YouTube. And you know how some knitters, as soon as they see you wearing something you've made, turn a little of it to the inside to see how good your finishing technique is? The first morning I wore my tallit to synagogue, the first person to comment on it picked up a corner and looked at the tzitzit (the fringes), to see whether I'd done them European-style or Mediterranean-style. (European, fyi. The Sephardic technique looked harder.)

So there it is. The finished object weighs about 755 g, including fringe, so about 15 skeins of Koigu. It measures about 38" x 61". The size isn't perfect: at the Sh'ma, when we gather the fringes from all four corners and hold them to our lips, the lower edges are awkward and stretched. But I'm seriously not sure which dimension would have to change, or by how much, to fix that, and I'm certainly not thinking about un-finishing it to make the adjustment. The closer you look, the less red it is; in addition to the obvious orange and pink, and the yellow, brown, and black that you can see in these pictures, there are spots that have a little forest green and a nearly-navy blue. In short, as with anything that has enough KPPPM in it, I'm not sure there are any colors it doesn't have.

Subscribe to:
Posts (Atom)